Overview
Teaching: 15 min Exercises: 0 minQuestions
What is JupyterHub?
Objectives
learn about our overall computing framework for geohackweek
JupyterHub Access
The JupyterHub for GeohackWeek is accessible at: https://jupyterhub.cloudmaven.org
You will need a Github account for authentication.
Jupyter Notebook
- A Jupyter Notebook App is a web application for running and sharing notebook documents.
- A notebook document can contain code and other elements that are executable via a kernel. It can also contain rich text and figures.
- A kernel executes the code in a notebook document. A kernel can be an environment (e.g. a conda environment)
- A Jupyter Notebook can help encourage collaboration, and reduces the need to “reinvent the wheel”
JupyterHub What Is
Here is an amazing slide deck about Jupyterhub: JupyterHub Thing Explainer
If you’re lazy, here is one slide:

JupyterHub for GeohackWeek
This is a conceptual graphic of our cloud-based JupyterHub environment for geohackweek:
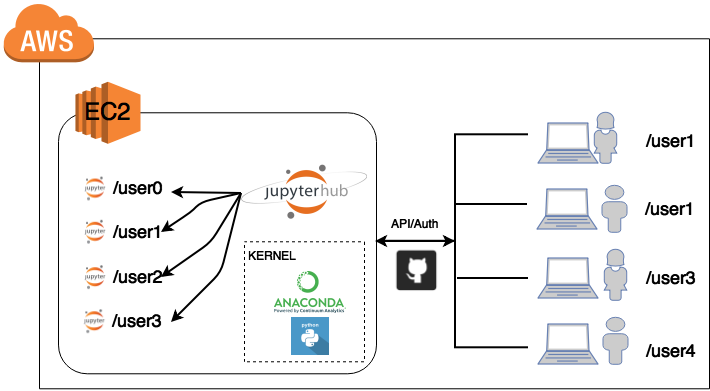
- AWS EC2 instance, Github authentication, multiple spawns
Initial Setup
Paths and folders
Open a new Jupyter Notebook terminal.
If you type conda, you will get a conda usage guide:
usage: conda [-h] [-V] command ...
If you get “conda: command not found”, you will need to add the conda path to your bash profile by exporting the path:
export PATH=/opt/anaconda/bin:$PATH
Next, we are going to clone the Git repository we will be using for the tutorials this week. You will need to clone this into the ‘notebooks’ folder in your home directory.
$ ls # check your present working directory and list available files and folders
$ cd notebooks # change directory to notebooks
$ pwd # check present working directory again, it should say something like /home/user/notebooks
$ git clone 'https://github.com/geohackweek/tutorial_contents.git'
$ ls # check that the folder is there
Notebooks and environments
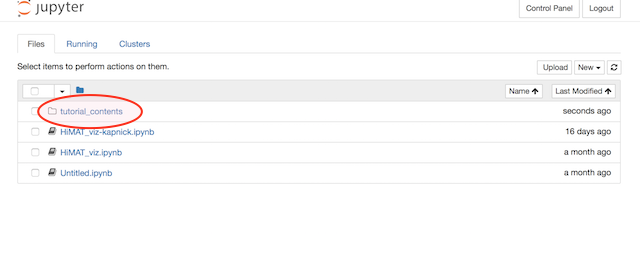
- Return to the Jupyterhub home tab
- You should now see tutorial_contents as a folder
- We will test out setting environments for our notebooks.
- Change directories to tutorial_contents > vector > notebooks
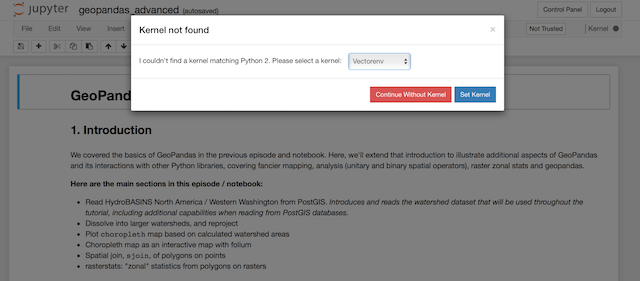
- Select geopandas_advanced.ipynb
- You will be prompted to select a kernel. Select the Vectorenv kernel.
Key Points