Overview
Teaching: 15 min Exercises: 0 minQuestions
What is Conda?
How can I use conda in managing all the libraries for my projects?
Objectives
explore how most people currently install and manage python libraries
discuss how current methods causes headaches in managing the vast libraries for various projects
0. Review from Preliminary
What is Conda?
conda is an open source package and environment management system for any programming language;
though it is quite popular in the python community.
What is Anaconda?
Anaconda is a distribution of conda. It is a data science platform that comes with a lot of packages.
What is Miniconda?
Unlike Anaconda, Miniconda doesn’t come with any installed packages by default.
Note that for miniconda, everytime you open up a terminal, conda won’t automatically be available. Run the command below to use conda within miniconda.
$ export PATH=$HOME/miniconda/bin:$PATH
What I’m using for this tutorial?
For this tutorial, I am using Anaconda. If you have miniconda, the commands will be the same! This also applies across operating systems (Except for the activation of environment).
Use the terminal window to access Conda in Linux or OS X and Anaconda prompt in Windows.
1. Managing Conda
Let’s first start by checking if conda is installed.
$ conda --version
conda 4.2.13
Conda Help and Manual
To see the full documentation for any command, type the command followed by
--help. For example, to learn about the conda update command:$ conda update --help
Once it has been confirmed that conda has been installed, we will now make sure that it is up to date.
$ conda update conda
Using Anaconda Cloud api site https://api.anaconda.org
Fetching package metadata: ....
.Solving package specifications: .........

Package plan for installation in environment //anaconda:

The following packages will be downloaded:

    package                    |            build
    ---------------------------|-----------------
    conda-env-2.6.0            |                0          601 B
    ruamel_yaml-0.11.14        |           py27_0         184 KB
    conda-4.2.12               |           py27_0         376 KB
    ------------------------------------------------------------
                                           Total:         560 KB

The following NEW packages will be INSTALLED:

    ruamel_yaml: 0.11.14-py27_0

The following packages will be UPDATED:

    conda:       4.0.7-py27_0 --> 4.2.12-py27_0
    conda-env:   2.4.5-py27_0 --> 2.6.0-0
    python:      2.7.11-0     --> 2.7.12-1
    sqlite:      3.9.2-0      --> 3.13.0-0

Proceed ([y]/n)? y

Fetching packages ...
conda-env-2.6. 100% |################################| Time: 0:00:00 360.78 kB/s
ruamel_yaml-0. 100% |################################| Time: 0:00:00   5.53 MB/s
conda-4.2.12-p 100% |################################| Time: 0:00:00   5.84 MB/s
Extracting packages ...
[      COMPLETE      ]|###################################################| 100%
Unlinking packages ...
[      COMPLETE      ]|###################################################| 100%
Linking packages ...
[      COMPLETE      ]|###################################################| 100%
Conda will compare versions and let you know what is available to install. It will also tell you about other packages that will be automatically updated or changed with the update. If there are newer version available, follow the instruction to install the newest version of conda.
In my case, the conda needed to be updated, along with this update, some dependencies also need to be updated. There is also a NEW package that will be INSTALLED in order to update conda.
2. Managing Environments
What is a conda environment and why is it so useful?
Using conda, you can create an isolated python environment for your project.
An environment is a set of packages that can be used in one or multiple projects.
The default environment with Anaconda is the root environment, which contains Anaconda default packages listed here.
There are two ways of creating a conda environment.
- An environment file in YAML format (
environment.yml). - Manual specifications of packages.
Creating environment with an environment file.
YAML? What’s that?
- YAML stands for YAML Ain’t Markup Language
- It is a human friendly data serialization standard for all programming languages.
An example of environment file (
environment.yml)This is an example of an environment file that will install
python 3.6,python-pip, andpyjokeslibrary using pip. Conda is friendly with pip, so if some packages are not found in Anaconda Cloud, then you can install them withpip install. Open up your favorite text editor, copy and paste the code below, save your file asenvironment.yml.name: playenv channels: - conda-forge dependencies: - python=3.6 - pip - pip: - pyjokes
Now, let’s install environment.yml environment file above so that we can create a conda environment called playenv.
$ conda env create --file environment.yml
Using Anaconda Cloud api site https://api.anaconda.org
Fetching package metadata .........
Solving package specifications: ..........
Linking packages ...
[      COMPLETE      ]|###################################################################################################################################################################| 100%
Collecting pyjokes
  Downloading pyjokes-0.5.0-py2.py3-none-any.whl
Installing collected packages: pyjokes
Successfully installed pyjokes-0.5.0
#
# To activate this environment, use:
# > source activate playenv
#
# To deactivate this environment, use:
# > source deactivate playenv
#
From the output above, the instruction highlighted ways to activate and deactivate environment. Note: This command is slighty different between operating systems.
Use an environment:
- Linux, OS X:
$ source activate playenv - Windows:
$ activate playenv
Deactivate an environment (goes back to root):
- Linux, OS X:
$ source deactivate - Windows:
$ deactivate
Creating environment by manually specifying packages.
We can create test_env conda environment by specifying the name, channel, and list of packages within the terminal window.
In the example below, I am creating the test_env environment that uses python 2.7 and a list of libraries: numpy, matplotlib, pandas.
$ conda create -c conda-forge -n test_env python=2.7 numpy matplotlib pandas
Conda will solve any dependencies between the packages like before and create a new environment with those packages.
Verifying current environment
To know the current environment that you’re in you can either look at your terminal:
(test_env) D-69-91-135-15:env_files lsetiawan$The
(test_env)in the beginning of the line indicates that I’m curently using thetest_envconda environment.Another way that you can check for your current active environment is a command:
$ conda env listtest_env * //anaconda/envs/test_env playenv //anaconda/envs/playenv root //anacondaThe current environment is indicated by (*) character. This is also a great way to see the list of environments that have been created. In the list, the path to each environment is also shown.
Sharing Environments with others
To share an environment, you can export your conda environment to an environment file. By doing this, the resulting environment file is very detailed with specific version listing.
Exporting your environment to a file called myenv.yml:
$ conda env export -f test_env.yml -n test_env
This will export a very detailed environment file that you can share with others.
This file specifies the package=version=build.
Note that this environment file will not work to share across platforms, since the builds and versions might be different for different operating systems.
Best practice to share environments
- When starting a new environment, always generate it from an environment file rather than the command line.
- As you add packages to the environment, be sure to update the environment file.
- Unless you have to, try to avoid specifying the version of each package. This will ensure you have the most up to date version that will work across platform.
If you follow these guidelines, you should be able to give your environment file to anyone, and they will be able to install your packages with no problem.
Making an exact copy of an environment and deleting environments
Copying an environment
We can make an exact copy of an environment to an environment with a different name.
This maybe useful for any testing versus live environments or python 2.7 vs python 3.6 for the same packages.
In this example, test_env is cloned to create live_env.
$ conda create --name live_env --clone test_env
Deleting an environment
Deleting an environment is very easy using conda.
Since we are only testing out our environment, we will delete live_env to remove some clutter. Make sure that you are not currently using live_env.
$ conda env remove -n live_env
3. Managing Packages
Seeing what packages are available
We will now check packages that are available to us.
The command below will list all the packages in an environment, in this case test_env.
The list will include versions of each package, the specific build,
and the channel that the package was downloaded from.
conda list is also useful to ensure that you have installed the packages that you desire.
$ conda list -n test_env
# packages in environment at //anaconda/envs/test_env:
#
Using Anaconda Cloud api site https://api.anaconda.org
blas                      1.1                    openblas    conda-forge
ca-certificates           2016.9.26                     0    conda-forge
certifi                   2016.9.26                py27_0    conda-forge
cycler                    0.10.0                   py27_0    conda-forge
freetype                  2.6.3                         1    conda-forge
functools32               3.2.3.2                  py27_1    conda-forge
libgfortran               3.0.0                         0    conda-forge
...
Searching for a certain package
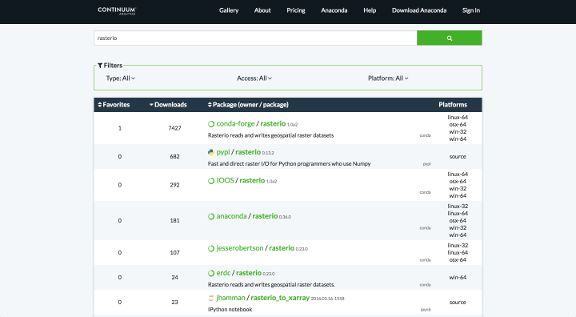
Some packages might not be available in conda, but are available in pypi. For example, we will search for rasterio within the anaconda cloud. It is not necessary to create an account with anaconda cloud, unless you’d like to contribute in the future when you are pro with conda.
Anaconda Cloud and Trusted Sources
Anaconda Cloud is a package management service that makes it easy to find, access, store and share public and private notebooks, environments, and conda and PyPI packages, and to keep up with updates made to the packages and environments you’re using (Ref. Anaconda Cloud Doc). Anaconda Cloud is made up of channels/owners. Each channels contains one or more conda packages.
It is important to be careful when downloading any packages from an untrusted source. Conda forge is a reliable source for many popular python packages. It is wise to research about the source of a conda package.
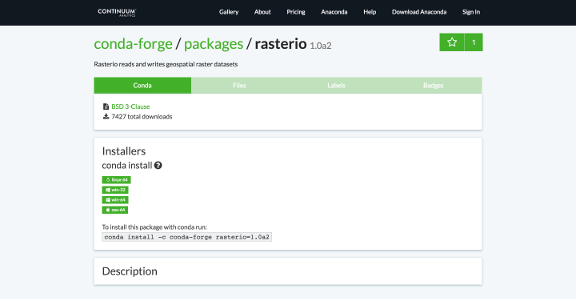
In this example, we will use rasterio from conda-forge. The anaconda cloud page for rasterio will show how to install the package, compatible OS, individual files for that package, etc.
If you are using anaconda, you can do this search within the command line:
$ anaconda search rasterio
Using Anaconda Cloud api site https://api.anaconda.org
Run 'anaconda show <USER/PACKAGE>' to get more details:
Packages:
     Name                      |  Version | Package Types   | Platforms
     ------------------------- |   ------ | --------------- | ---------------
     IOOS/rasterio             |    1.0a2 | conda           | linux-64, win-32, win-64, osx-64
     Terradue/rasterio         |   0.32.0 | conda           | linux-64
                                          : Fast and direct raster I/O for use with Numpy and SciPy
     anaconda/rasterio         |   0.36.0 | conda           | linux-64, win-32, win-64, linux-32, osx-64
     conda-forge/rasterio      |    1.0a2 | conda           | linux-64, win-32, win-64, osx-64
                                          : Rasterio reads and writes geospatial raster datasets
     dharhas/rasterio          |   0.23.0 | conda           | win-64
                                          : Rasterio reads and writes geospatial raster datasets.
     erdc/rasterio             |   0.23.0 | conda           | win-64
                                          : Rasterio reads and writes geospatial raster datasets.
     jesserobertson/rasterio   |   0.23.0 | conda           | linux-64, linux-32, osx-64
     jhamman/rasterio_to_xarray | 2016.03.16-1558 | ipynb           |
                                          : IPython notebook
     krisvanneste/rasterio     |   0.26.0 | conda           | win-64
     ocefpaf/rasterio          |   0.19.1 | conda           | linux-64, osx-64
     omgarcia/rasterio         |   0.25.0 | conda           | linux-64
     pypi/rasterio             |   0.13.2 | pypi            |
                                          : Fast and direct raster I/O for Python programmers who use Numpy
     robintw/rasterio          |   0.35.1 | conda           | osx-64
                                          : Rasterio reads and writes geospatial raster datasets
     sgillies/rasterio         |     0.15 | conda           | osx-64
     ztessler/rasterio         |   0.31.0 | conda           | osx-64
                                          : Fast and direct raster I/O for use with Numpy and SciPy
Found 15 packages
Installing conda package
Under the name column of the result in the terminal or the package column in the Anaconda Cloud listing, shows the necessary information to install the package. Ex. conda-forge/rasterio. The first word list the channel that this package is from and the second part shows the name of the package.
To install the latest version available within the channel, do not specify in the install command. We will install version 0.35 of rasterio from conda-forge into test_env in this example. Conda will also automatically install the dependencies for this package.
$ conda install -c conda-forge rasterio=0.35
Pre-configuring Channels
If you have a few trusted channels that you prefer to use, you can pre-configure these so that everytime you are creating an environment, you won’t need to explicitly declare the channel.
$ conda config --add channels conda-forge
Removing Conda Package
We decided that rasterio is not needed in this tutorial, so we will remove it from test_env. Note that this will only remove the main package rasterio, not its dependencies.
$ conda remove -n test_env rasterio
Using Anaconda Cloud api site https://api.anaconda.org
Fetching package metadata .........
Solving package specifications: ..........

Package plan for package removal in environment //anaconda/envs/test_env:

The following packages will be REMOVED:

    rasterio: 0.35.1-np111py27_1 conda-forge

Proceed ([y]/n)? y

Unlinking packages ...
[      COMPLETE      ]|#######################################################################################################| 100%
For lots more feature of conda, check out the documentation here
Key Points
conda can be installed in two ways (Anaconda and Miniconda)
this tool will prevent headaches when trying to install packages with dependancies or managing multiple libraries/projects
projects can be separated by individual environments
Reproducible environments can be created easily
Most conda packages are friendly across all platforms
If you’re not convinced about using conda, read this great blog